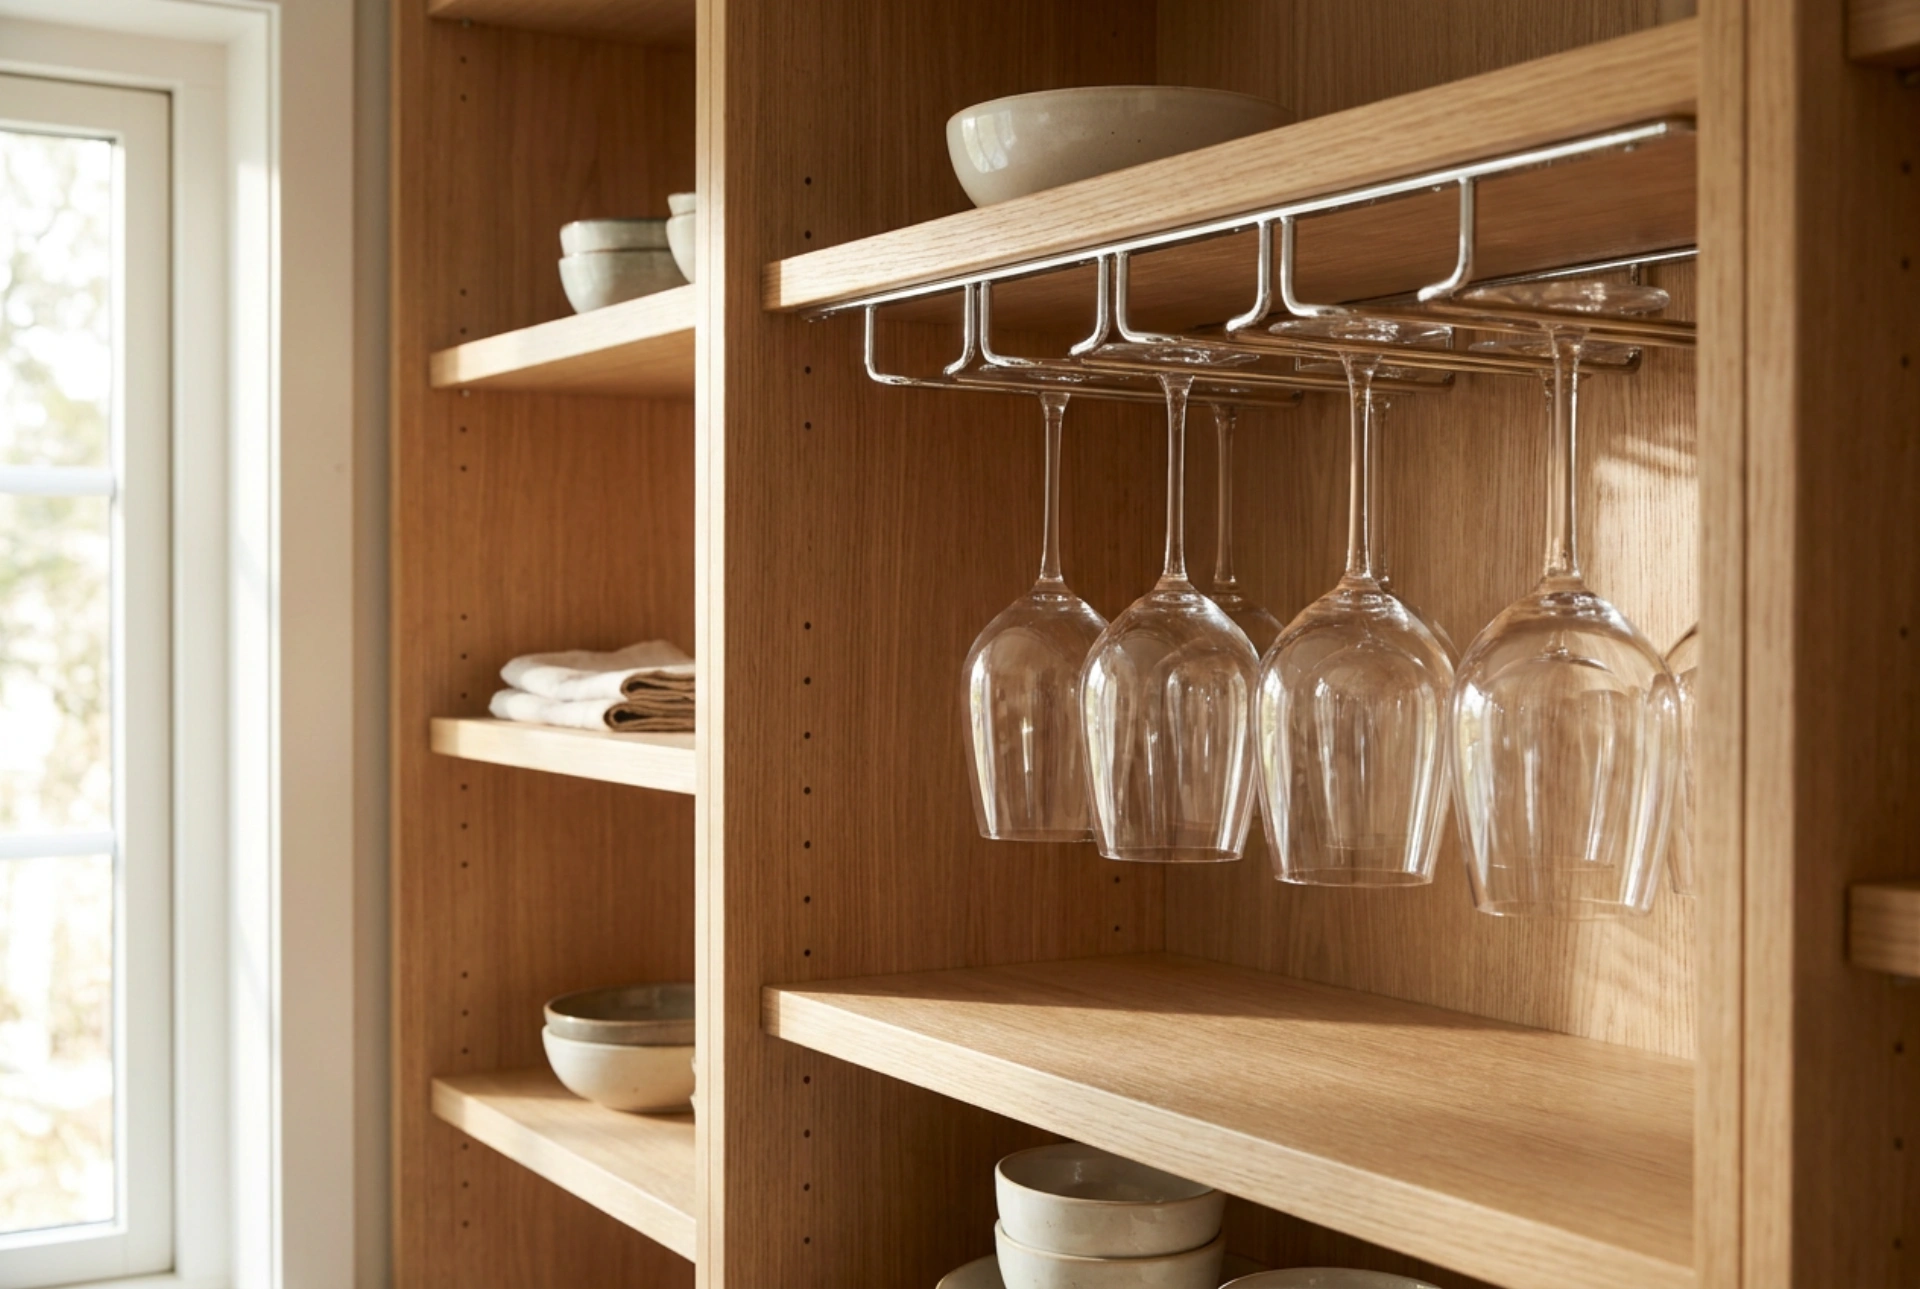


Installing an under-cabinet stemware rack optimizes kitchen space and protects fragile glass stems from accidental tipping. Doing this successfully requires understanding load distribution, structural integrity of cabinet materials, and physical spacing to prevent vibration-induced glass damage.
1. Analyzing the Substrate and Load Distribution
Before installing any rack, you must identify the composition of your cabinet base. Kitchen cabinets are typically constructed from solid wood, plywood, medium-density fibreboard (MDF), or particleboard. Each material has distinct physical properties that dictate how it holds fasteners under tension.
Solid wood and high-quality plywood offer excellent screw thread retention. Particleboard and MDF, however, consist of compressed wood fibres bonded with resin. These materials are highly susceptible to splitting and thread stripping if fasteners are driven in directly without pilot holes. Because a fully loaded rack of heavy crystal wine glasses exerts constant downward gravitational force combined with dynamic vibrational energy when cabinet doors are opened or closed, secure fastening is critical. Ensure the cabinet bottom panel is at least 15 millimetres thick to safely anchor the screws without puncturing the interior surface.
2. Calculating Clearance and Preventing Glass Collision
Glass is an amorphous solid that is highly sensitive to mechanical shock. When wine glasses hang in a rack, they are prone to swaying when nearby drawers or doors are slammed. If the spacing is inadequate, the widest parts of the glasses (the bowls) will collide, creating micro-fractures along the contact points that eventually lead to catastrophic failure during washing or pouring.
To determine the correct placement, measure the widest diameter of your largest wine glasses (usually Cabernet or Burgundy glasses) and add a safety margin of at least 15 to 20 millimetres between each parallel track. Furthermore, measure the height of your tallest stemware. There must be sufficient clearance beneath the hanging glasses so that countertops remain usable and items stored underneath do not strike the delicate glass rims.
3. Selecting and Preparing Fasteners
Choosing the correct screw is essential for a long-lasting, safe installation. Never use drywall screws, which have brittle shafts prone to snapping under shear stress. Instead, opt for pan-head or round-head wood screws. The flat underside of a pan-head screw distributes pressure evenly across the mounting plate of the metal rack, preventing the rack from wobbling.
To prevent splitting the wood and to ensure maximum thread contact, you must drill pilot holes. Select a drill bit with a diameter slightly smaller than the root diameter of the screw (the inner shaft excluding the threads). To avoid drilling completely through the bottom shelf of your cabinet, wrap a piece of masking tape around the drill bit at the desired depth as a visual guide. This simple depth-stop technique ensures you only drill to about 80 percent of the cabinet bottom's thickness.
4. Step-by-Step Installation Protocol
- Template Alignment: Hold the rack against the underside of the cabinet. Use a pencil to mark the exact centre of each screw hole. Ensure the rack is perfectly perpendicular to the front edge of the cabinet to maintain visual alignment.
- Drilling Pilot Holes: Position your drill perpendicular to the cabinet surface. Drill steadily to the depth indicated by your tape marker. Pull the drill out cleanly to remove wood debris from the hole.
- Securing the Rack: Align the rack with the drilled holes. Insert the screws manually using a hand screwdriver rather than a power drill. This allows you to feel the resistance of the wood and prevents over-tightening, which can strip the threads in MDF or particleboard. Tighten until the rack is flush and does not shift.
5. Thermal and Mechanical Considerations for Daily Use
Once installed, handling your glassware correctly prevents stress fractures. Never hang glasses immediately after a hot dishwasher cycle. The rapid thermal transition combined with the localized mechanical pressure of the metal prongs against the glass base can cause thermal shock. Allow the glassware to cool completely to room temperature before hanging. When sliding glasses onto the rack, guide them gently by the base rather than the stem, minimizing torsional stress on the weakest part of the glass structure.